

A name plate used etching |
|
| PURPOSE |
The process of learning electrolysis. We can manufacture something in a chemical domain. |
|
| TARGET |
| The junior high school second, the third grade |
|
| CATEGORY |
| Chemistry and manufacture |
|
| < Production of the copper name plate > Need ①Electrolysis |
| (1)Copper plate (thickness: 5mm)…2 |
| (2) Na2SO4 (0.1mol/L)…25mL |
| (3) Sulfuric acid |
| (4)Transfer sheet (Press-n-Peel America Techniks company) |
| (5)A laser printer |
| (6)Household pressing iron |
| (7)Polishing agent for metal |
| (8) Alkali manganese dry cell ,size D …2 |
| (9) Electrolysis cell |
| (10)Bamboo skewer |
| (11)Clip…2 |
|
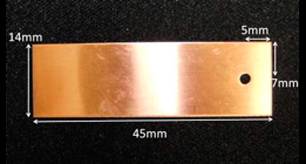 Fig.1 used copper plate |
|
| ②The formation of the alloy |
| (1)Tweezers |
| (2)Hotplate or gas stove |
| (3) Electrolytic solution Show mass per electrolyte 1L ・ZnSO4・7H2O …300g ・NH4Cl …18g ・Al2 (SO4)3 …37g ・H3BO3 ...30g |
| (4)Zinc plate (thickness: 0.5mm) …1 |
|
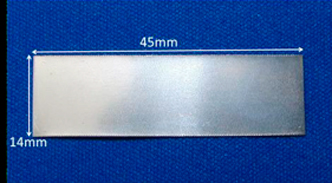 Fig.2 used zinc plate |
|
| Production process ①Electrolysis |
| (1) Wash the surface of the copper plate using cleanser and remove sebum. |
| (2) Next, fix a transfer sheet to the copper plate. |
| (3) A copper plate (being the name plate) is an anode. Another is a cathode. And we perform electrolysis at 3V for 15 minutes. |
| (4) Last, wipe off the transfer sheet in a nail remover and wash it pure water. |
|
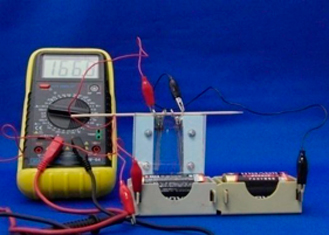 Fig.3 state of the electrolysis |
|
| ②Formation of alloy |
| (1)Copper plate being the nameplate is positive. Zinc plate as a counter electrode is a negative electrode. They are immersed in the electrolyte solution. Perform electrolysis at 3V for 10 seconds. |
| (2) This copper plate will have been galvanized. Wash this plate with pure water, and heat it with gas burner until the color change. |
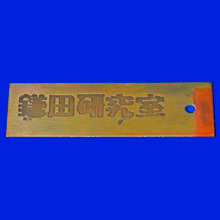
| (3) It become brass nameplate, polish it using metal polish. |
|
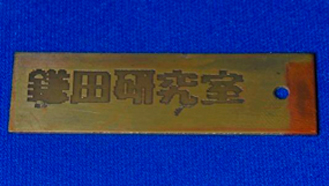 Fig.4 brass name plate |
|
| < About cell of electrolysis > Something to need: |
| Expanded polystyrene, for body ... (thickness 20mm) |
| Expanded polystyrene, for base ... (thickness 5mm) |
| Acrylic plate, for side body ... (thickness 2mm) |
| Bolts and nuts |
|
| How to make: |
| (1)Cut the acrylic plate and expanded polystyrene board. Drill a hole in these plate.(See figure) |
| (2)Assemble the parts, and through the bolt into the hole and fix with a nut. |
| (3)Adhere the body and base with adhesive. |
|
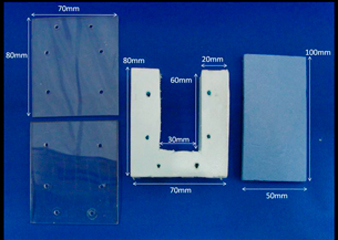 Fig.5 cutting the acrylic plate and polystyrene board |
|
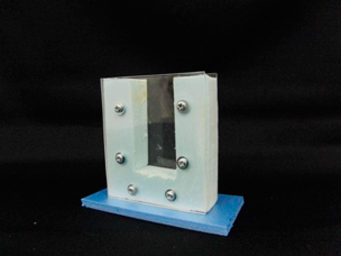 Fig.6 cell of electrolysis |
|
| < How to make of transfer sheet and How to print > Something to need: |
| Copper plate ...1 |
| Transfer sheet...1 |
| A laser printer |
| Household pressing iron |
| Cleanser |
|
| How to make and print: |
| 1) On slide the PowerPoint2007, Make a rectangle (14mm × 45mm)of the size of the name plate. On the figure, draw the design of the name plate. At this time, the white part to dissolve. The black parts not dissolve. |
| (2) Graphic design reverse right to left. |
| (3) Save this design in JPEG format.The picture that you saved will be put on the new slide that is set to the size of the transfer sheet . |
| (4) This design print on the printing surface of the transfer sheet with a laser printer. |
| (5) Cut the design. Place the design on top of the copper plate, and it will be heated using the iron of high temperature until a black stand out. |
| (6) Copper plate is immersed in water for 1 minute. Be peel the transfer sheet off slowly. |
| 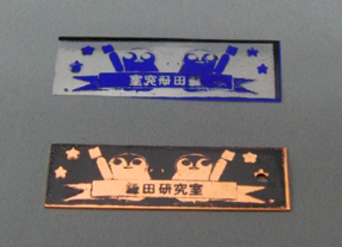 Fig.7 After peeling off the transfer sheet |
|